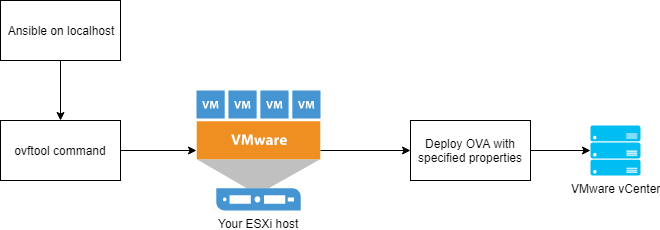
You may currently have this pipe-line in your CI/CD process that involves running ovftool directly on your ESXi host so as to deploy an OVA appliance directly from it and with as less overhead as possible as in this tutorial on virtuallyGhetto or you could have picked up some tips about running ovftool on ESXi from this article that I wrote some time ago.
However, that is certainly not the best solution for many reasons. For example, if the input is not sanitized in some location(-s) then it becomes trivial to execute any command on the ESXi host. Thus, instead I recommend you to use a tool like Terraform to save your infrastructure as code in a Git repository, for example. With the 1.x version of the Terraform’s vSphere provider you can implement such pipe-line in Terraform as well.
It has its down-sides, though. For instance, it is impossible to explicitly express dependencies between module resources however I still think that tool is worth-while and future-proof. Even though it has its downsides, you should still move over to Terraform. I will show you how to do that.
Your pipe-line before might look something like this:

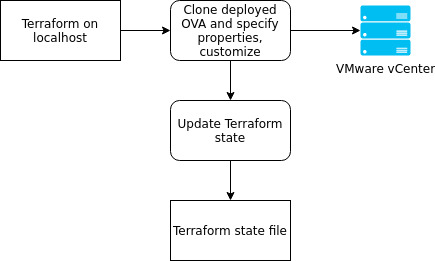
Instead, we will transform it to this:
The key idea is that instead of deploying the OVA via ovftool and specifying the properties up front, you should deploy it once without specifying anything and without turning the virtual machine on. Afterwards, convert it to a template and then you should clone that virtual machine and specify the properties. This way, after turning it on the first time, the fresh properties will be picked up. Also, because we will only deploy it once then there is no need to do it directly on the ESXi host every time. There are no time savings that we could win after the first import so let’s just ditch the idea of deploying directly from the ESXi host entirely. That’s the main change.
Deploying the OVA first time
To deploy the OVA the first time, you could use something like govc which is freely available instead of ovftool. Before downloading ovftool you are forced to accept certain terms and conditions, and create an VMware account which can become a nuisance so I recommend you to use other tools.
You could invoke govc like this:
GOVC_URL=user:pass@host govc import.ova -ds=datastore -folder=somefolder -host=host -name=template_from_ovf ./vmware-vcsa.ova
The -option parameter is not really useful in our case because we want to not specify any properties on purpose. Other parameter that you may find useful is -pool which specifies the resource pool to which the new virtual machine will be deployed to.
After deploying the OVA, convert it to a template as such:
GOVC_URL=user:pass@host govc vm.markastemplate template_from_ovf
Now it is ready for usage by the Terraform part of our pipe-line.
Terraform: provisioning the VMs
Since the 1.0.0 version of the vSphere Terraform provider, it supports specifying the vApp (OVA) properties. We will leverage this feature to specify them after cloning a new virtual machine from that template. I’m not going to go over how to use Terraform in this article but I will provide an example of an resource vsphere_virtual_machine. It will do just what we need for this part of the pipe-line.
In main.tf (or whatever other file that ends in .tf. You could use different .tf files for different virtual machines) you need to have something more or less this:
data "vsphere_datacenter" "dc" {
  name = "dc1"
}

data "vsphere_datastore" "datastore" {
  name          = "datastore1"
  datacenter_id = "${data.vsphere_datacenter.dc.id}"
}

data "vsphere_resource_pool" "pool" {
  name          = "cluster1/Resources"
  datacenter_id = "${data.vsphere_datacenter.dc.id}"
}

data "vsphere_network" "network" {
  name          = "public"
  datacenter_id = "${data.vsphere_datacenter.dc.id}"
}

data "vsphere_virtual_machine" "tempate_from_ovf" {
  name          = "template_from_ovf"
  datacenter_id = "${data.vsphere_datacenter.dc.id}"
}

resource "vsphere_virtual_machine" "vm" {
  name             = "terraform-test"
  resource_pool_id = "${data.vsphere_resource_pool.pool.id}"
  datastore_id     = "${data.vsphere_datastore.datastore.id}"

  num_cpus = 2
  memory   = 1024
  guest_id = "${data.vsphere_virtual_machine.template.guest_id}"

  scsi_type = "${data.vsphere_virtual_machine.template.scsi_type}"

  network_interface {
    network_id   = "${data.vsphere_network.network.id}"
    adapter_type = "${data.vsphere_virtual_machine.template.network_interface_types[0]}"
  }

  disk {
    name             = "disk0"
    size             = "${data.vsphere_virtual_machine.template.disks.0.size}"
    eagerly_scrub    = "${data.vsphere_virtual_machine.template.disks.0.eagerly_scrub}"
    thin_provisioned = "${data.vsphere_virtual_machine.template.disks.0.thin_provisioned}"
  }

  clone {
    template_uuid = "${data.vsphere_virtual_machine.template_from_ovf.id}"
  }

  vapp {
    properties {
      "guestinfo.hostname"                        = "terraform-test.foobar.local"
      "guestinfo.interface.0.name"                = "ens192"
      "guestinfo.interface.0.ip.0.address"        = "10.0.0.100/24"
      "guestinfo.interface.0.route.0.gateway"     = "10.0.0.1"
      "guestinfo.interface.0.route.0.destination" = "0.0.0.0/0"
      "guestinfo.dns.server.0"                    = "10.0.0.10"
    }
  }
}
(Copied verbatim from here. You can find much more information there)
I will go over each section:
- At first information is gathered from various data sources: vsphere_datacenter, vsphere_datastore, and so on.
- After that, a new resource vsphere_virtual_machine is created with name “vm”. The VM itself will have the name “terraform-test”. Some other options are specified that you can find in the example. Everything looks like the same except for the vapp section. In there, you should specify the OVA properties. You could list all of them by using this command:
ovftool /the/file.ova
Also, the vSphere client can help you out with this if you will go to the File > Deploy OVF Template. Another option is to check out the manifest file inside of the OVA file. Just open it with 7zip or some other program which can read archive files.
- Gather the properties via your chosen method and specify them in the vapp section.
To understand what other options mean you should consult the vsphere provider documentation in terraform. I will not copy and paste it here for brevity.
Afterwards, run terraform apply with your custom options (if applicable) and watch how terraform will pick up everything and show you the details of the actions that will be performed if you will enter yes. So, finally, just enter yes and watch how the virtual machine will be created.
Conclusion
This concludes this tutorial. Now in case you need to create more virtual machines from the same template, duplicate the vsphere_virtual_machine resource declaration and others (if needed). Run terraform apply again and it will create the other virtual machines. You might want to provide -auto-approve to terraform apply in your CD pipe-line – that way you will not have to enter yes all the time. Check out the other options here.
By using this method, your deployment pipe-line just became less intrusive, faster, and more flexible because you can actually specify the configuration of the resulting VM whereas with the old method you were forced to be stuck with the VM configuration specified in the OVA file unless you had some post-provisioning scripts in place. Have fun!
It looks like “tempate_from_ovf” should equal “template”.