Why os.move() Sometimes Does Not Work And Why shutil.move() Is The Savior?

Recently I ran into an issue where this, for example, code fails:

import os

os.rename('/foo/a.txt', '/bar/b.txt')

Traceback (most recent call last):
File "", line 1, in 
OSError: [Errno 18] Invalid cross-device link

The documentation for the os module says that sometimes it might fail when the source and the destination are on different file-systems:

os.rename(srcdst*src_dir_fd=Nonedst_dir_fd=None)

Rename the file or directory src to dst. If dst is a directory, OSError will be raised. On Unix, if dst exists and is a file, it will be replaced silently if the user has permission. The operation may fail on some Unix flavors if src and dst are on different filesystems. If successful, the renaming will be an atomic operation (this is a POSIX requirement). On Windows, if dst already exists, OSError will be raised even if it is a file.

How could it fail? Renaming (moving) a file seems like such a rudimentary operation. Let’s try to investigate and find out the exact reasons…

Reason why it might fail

The fact that the move function is inside the os module implies that it uses the facilities provided by the operating system. As the Python documentation puts it:

This module provides a portable way of using operating system dependent functionality.

In this case, it (probably, depends on the implementation, obviously) uses the rename function in the C language because that what moving is and that in turn calls the rename system call. The system call is even kind of defined in the POSIX collection of standards. It is an extension of the function rename in the C standard but it sort of implies that an official system call exists as well. As the official text of POSIX says, rename can fail if:

[EXDEV] The links named by new and old are on different file systems and the implementation does not support links between file systems.

Even Linux does not support this so this error message is not that uncommon. As the rename(2) manual page says:

EXDEV oldpath and newpath are not on the same mounted filesystem. (Linux permits a filesystem to be mounted at multiple points, but rename() does not work across different mount points, even if the same filesystem is mounted on both.)

The curious case of Linux

The Linux kernel has, as we guessed, an official system call for renaming files. Actually, it even has a family of system calls related to this operation: renameat2, renameat, and rename. Internally, they all call the function sys_renameat2 with different actual parameters. And inside of it the code checks if src and dst are at the same mounted file-system. If not, –EXDEV is returned which is then propagated to the user-space program:

/* ... */
        error = -EXDEV;                                                                                                           
        if (old_path.mnt != new_path.mnt)                                                                                         
                goto exit2;  
/* ... */

Then the error is returned:

/* ... */
exit2:                                                                                                                            
        if (retry_estale(error, lookup_flags))                                                                                    
                should_retry = true;                                                                                              
        path_put(&new_path);                                                                                                      
        putname(to);                                                                                                              
exit1:                                                                                                                            
        path_put(&old_path);                                                                                                      
        putname(from);                                                                                                            
        if (should_retry) {                                                                                                       
                should_retry = false;                                                                                             
                lookup_flags |= LOOKUP_REVAL;                                                                                     
                goto retry;                                                                                                       
        }                                                                                                                         
exit:                                                                                                                             
        return error;                                                                                                             
}

This explicit check has been for forever in this function. Why is it there, though? I guess Linux just took an simpler (and more elegant, should I say) path here and added this constraint from the beginning just so that the code for the file-systems would not have to accompany for this case. The code of different file-systems is complex as it is right now. You could find the whole source code of this function in fs/namei.c.

Indeed, old_dir->i_op->rename() is later called in sys_renameat2old_dir is of type struct inode *, i_op is a pointer to a const struct inode_operations. That structure defines a bunch of pointers to functions that perform various operations with inodes. Then different file-systems define their own variable of type struct inode_operations and pass it to the kernel. It seems to me that it would be indeed a lot of work to make each file-systems rename() inode operation work with every other file-system. Plus, how would any file-system ensure future compatibility with other file-systems that the user could use by loading some custom made kernel module?

Fortunately, we could implement renaming files by other means, not just by directly calling the rename system call. This is where shutil.move() comes in…

Difference between os.move() and shutil.move()

shutil.move() side-steps this issue by being a bit more high-level. Before moving it checks whether src and dst reside on the same file-system. The different thing is here what it does in the case where they do not. os.move() would blindly fall on its face here but shutil.move() is “smarter” and it does not just call the system call with the expectation that it will succeed. Instead, shutil.move() copies the content of the src file and writes it to the dst file. Afterwards, the src file is removed. As the Python documentation puts it:

If the destination is on the current filesystem, then os.rename() is used. Otherwise, src is copied (using shutil.copy2()) to dst and then removed.

So not only it copies the content of the file but shutil.copy2() ensures that the meta-data is copied as well.This presents an issue because the operation might get interrupted between the actual copying of the content and before src is removed so potentially you might end up with two copies of the same file. Thus, shutil.move() is the preferred solution to the original problem presented at the start of the article but however be wary of the possible problems and make sure that your code handles that case if it might pose a problem to your program.

Tutorial: Automatic, Reproducible Preparation of Virtual Machine templates for your vSphere environment with HashiCorp’s Packer

Introduction

Let us say that you are using an vSphere (VMWare vCenter + one or more ESXi servers) environment in your company and you are creating virtual machines pretty often. Obviously you are familiar with the virtual machines template functionality but where could you get the templates? Well, one of the options is to look for them somewhere on the internet but that is not a very reliable thing to do since you have to trust a third-party to provide these to you. Most, if not all, operating systems distributors do not provide a VMWare template for their operating system. For example, Canonical only provides Ubuntu in a form of an ISO file. Thus, you have to change your approach and make the templates yourself. However, doing that manually that is tedious and very menial so you will look for solutions to this problem. Packer is something that solves this problem.

From here on, I will assume some level of familiarity with Packer here. It has a builder called vmware-iso that looks like it can do the trick. However, you will run into problems quickly. For example, the vsphere-template post-processor only works if you run the vmware-iso builder remotely. It does not work with your local virtual machine. Because of this and other issues you have to apply some tricks to make the post-processing section work. Also, after using that builder once, you might notice that there are some short-comings in how Packer detects what IP the virtual machine has. It takes the first DHCP lease from ethernet0 and uses that to communicate with your virtual machine even though it is, by default, the network that is used for network address translation (NAT). This post will show you how to make it all work. By the end of it, you should have a working pipe-line:

  • automatically a new virtual machine is created in VMware Workstation with needed parameters
  • specified ISO is mounted and the OS is installed using a “pre-seeded” configuration
  • some optional post-processing scripts will be run on the virtual machine
  • the resulting virtual machine template will be uploaded to the specified vCenter

As you can see, this process is perfect for making golden templates of various operating systems. Let us delve into by using Ubuntu 16.04 as an example.

Step 1: starting up the virtual machine

The vmware-iso builder is perfect for doing except we will have to apply some tricks to make Packer pick up the correct IP address. By default, the first and only network is used for network address translation which means that when the virtual machine will be deployed, Packer will pick up the given DHCP lease and it will try to connect to it via SSH for provisioning. Because network address translation is happening, there is no way to reach that deployed virtual machine without any tricks.

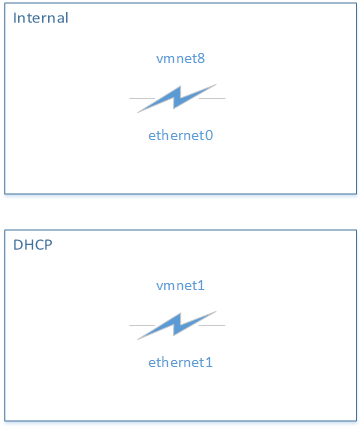
To solve this problem, I recommend you to specify custom VMX properties which will make ethernet0 be connected to vmnet8, and ethernet1 to vmnet1vmnet8 is an internal, private network that will be used for communication between the host machine and the virtual machine. ethernet1 is connected to vmnet1, which is the network with an DHCP server and is used for network address translation which lets the virtual machine access the Internet. Such configuration of vmnet1 and vmnet8 is the default on VMWare Workstation so no changes are needed on that side.

This is achievable by specifying the following in the builders section of the JSON configuration file:

{
    "vmx_data": {
        "ethernet0.present": true,
        "ethernet0.startConnected": true,
        "ethernet0.connectionType": "custom",
        "ethernet0.vnet": "vmnet8",
        "ethernet1.present": true,
        "ethernet1.startConnected": true,
        "ethernet1.connectionType": "custom",
        "ethernet1.vnet": "vmnet1"
    }
}

You can find more information about VMX properties in this website: http://sanbarrow.com/vmx/vmx-network-advanced.html.

However, after provisioning the virtual machine, you might want to disable the second interface because it is a good default to only have one virtual NIC connected to a virtual machine template by default. If the user will want to add more networks and NICs – it is up to them. So to disable the second NIC after everything, add this to the configuration file that is passed to Packer:

{
    "vmx_data_post": {
        "floppy0.present": false,
        "ethernet1.present": false
    }
}

Note that this also disables the virtual floppy disk after provisioning. This is needed to unmount the floppy disk that has the pre-seed file. Obviously it is not needed in the final virtual machine template. This is all you need so far in this tutorial. You could run the file now and see the Ubuntu installer be automatically started. This is how my builders section looks like:

{
  "builders": [
    {
      "type": "vmware-iso",
      "iso_url": "http://releases.ubuntu.com/16.04/ubuntu-16.04.3-server-amd64.iso",
      "iso_checksum": "10fcd20619dce11fe094e960c85ba4a9",
      "iso_checksum_type": "md5",
      "ssh_username": "root",
      "ssh_password": "Giedrius",
      "vm_name": "Ubuntu_16.04_x64",
      "ssh_wait_timeout": "600s",
      "shutdown_command": "shutdown -P now",
      "output_directory": "ubuntu_1604",
      "boot_command": [
        "<enter><wait><f6><esc><bs><bs><bs><bs><bs><bs><bs><bs><bs><bs><bs><bs><bs><bs><bs><bs><bs>",
        "<bs><bs><bs><bs><bs><bs><bs><bs><bs><bs><bs><bs><bs><bs><bs><bs><bs><bs><bs><bs><bs><bs>",
        "<bs><bs><bs><bs><bs><bs><bs><bs><bs><bs><bs><bs><bs><bs><bs><bs><bs><bs><bs><bs><bs><bs>",
        "<bs><bs><bs><bs><bs><bs><bs><bs><bs><bs><bs><bs><bs><bs><bs><bs><bs><bs><bs><bs><bs><bs>",
        "/install/vmlinuz<wait>",
        " auto<wait>",
        " console-setup/ask_detect=false<wait>",
        " console-setup/layoutcode=us<wait>",
        " console-setup/modelcode=pc105<wait>",
        " debconf/frontend=noninteractive<wait>",
        " debian-installer=en_US<wait>",
        " fb=false<wait>",
        " hostname=ubuntu1604<wait>",
        " initrd=/install/initrd.gz<wait>",
        " kbd-chooser/method=us<wait>",
        " keyboard-configuration/layout=USA<wait>",
        " keyboard-configuration/variant=USA<wait>",
        " locale=en_US<wait>",
        " noapic<wait>",
        " preseed/file=/floppy/ubuntu_preseed.cfg",
        " -- <wait>",
        "<enter><wait>"
      ],
      "guest_os_type": "ubuntu-64",
      "floppy_files": [
        "./ubuntu_preseed.cfg"
      ],
      "vmx_data": {
        "ethernet0.present": true,
        "ethernet0.startConnected": true,
        "ethernet0.connectionType": "custom",
        "ethernet0.vnet": "vmnet8",
        "ethernet1.present": true,
        "ethernet1.startConnected": true,
        "ethernet1.connectionType": "custom",
        "ethernet1.vnet": "vmnet1"
      },
      "vmx_data_post": {
        "floppy0.present": false,
        "ethernet1.present": false
      }
    }
  ]}

Step 2: installing the operating system in the new virtual machine

There is almost no trick that has to be done here except that you have to make sure that DHCP is enabled on all network interfaces. Many operating systems’ installers only let you choose the default interface on which DHCP is enabled. This could be worked around with some custom amendments to the configuration.

For example, on Ubuntu 16.04 the easiest way to do this is to append some text to /etc/network/interfaces which will enable DHCP on the second interface as well. You can find more information on that file here: https://help.ubuntu.com/lts/serverguide/network-configuration.html. So, you should have something like this in your pre-seed file:

d-i preseed/late_command string in-target sh -c 'echo "auto ens33\niface ens33 inet dhcp" >> /etc/network/interfaces'

ens33 is the default name of the interface that it given to the second one on my set up so it is used here. As you can see, the network configuration is changed and DHCP client is enabled on the ens33 interface as well. If you are using some other operating system then refer to its manual to find out what exactly you have to change to enable the DHCP client on the second interface.

You are free to add anything you want to to the provisioners section of the Packer configuration. In my case, I am uploading some default configuration to /etc/profile.d and I am making those files executable so that they would be executed each time someone logs in.

Step 3: post processing a.k.a. uploading the actual template

This is an important trick that you have to do. The default post-processor only support this action if you use the vmware-iso builder in a remote configuration so some trickery is needed.

At first, you need to run the OVFTool to convert the *.vmx file to an *.ovf. Use the shell-local post-processor like this:

{
  "type": "shell-local",
  "inline": [
    "/c/Program\\ Files\\ \\(x86\\)/VMware/VMware\\\nWorkstation/OVFTool/ovftool.exe ubuntu_1604/Ubuntu_16.04_x64.vmx ubuntu_1604/Ubuntu_16.04_x64.ovf"
  ]
}

This will convert the resultant vmx file to an ovf one. Next, you have to use the artifice post-processor to change the list of artifacts so that the next post-processor that we are going to use would pick up the new ovf file as well.

The post-processor that we will use is called vsphere-template. It sifts through the artifact list (that we will generate with artifice) and uploads the OVF file to the vCenter, and converts it into an template. You can find it here: https://github.com/andrewstucki/packer-post-processor-vsphere-template (props to andrewstucki!). You can get all of the details in there. To make it short:

  • download the executable file into some known location
  • edit %APPDATA%/packer.config and add something like this there (change the exact path depending on your set-up):
{
  "post-processors": {
    "vsphere-template": "C:\\packer-post-processor-vsphere-template_darwin_amd64.exe"
  }
}

For the final piece, you will have to create a post-processor chain with vsphere-template and artifice like it is described here: https://www.packer.io/docs/post-processors/artifice.html. You will need to enclose the last two post-processors in square brackets. The final version of the post-processor section looks like this:

{
  "post-processors": [
    {
      "type": "shell-local",
      "inline": [
        "/c/Program\\ Files\\ \\(x86\\)/VMware/VMware\\ Workstation/OVFTool/ovftool.exe ubuntu_1604/Ubuntu_16.04_x64.vmx ubuntu_1604/Ubuntu_16.04_x64.ovf"
      ]
    },
    [
      {
        "type": "artifice",
        "files": [
          "ubuntu_1604\\*"
        ]
      },
      {
        "type": "vsphere-template",
        "datacenter": "example_datacenter",
        "datastore": "example_datastore",
        "host": "example_host",
        "password": "example_password",
        "username": "example_username",
        "vm_name": "Ubuntu_16.04_x64",
        "resource_pool": "example_resourcepool",
        "folder": "example_folder"
      }
    ]
  ]
}

Links

The Packer JSON configuration file looks like this: https://gist.github.com/GiedriusS/04b9881595882fdee61a83d3c7dd3f3b

The pre-seed file that I used for Ubuntu 16.04: https://gist.github.com/GiedriusS/9053014e39ad17a7e4669e28bc7494bc

For other machines there is not much difference except you will have to figure out what boot options to use, the format of the installer configuration, and what to pass to the network management daemon that is used in the operating system to enable DHCP on all interfaces.