Intro
Thanos Query is the component of Thanos that fans out a query to one or more nodes that implement the StoreAPI and then it can deduplicate the results. It also implements the Prometheus API which lets you use it via Grafana.
Any of the other components may be the receivers:
- Thanos Receive;
- Thanos Rule;
- Thanos Sidecar;
- Thanos Compact;
- Thanos Query itself.
It is tricky to know how much resources you will need for any given deployment of Thanos Query because it depends on a lot of different criteria. So, to know that and to actually test the limits in practice, you ought to perform what is commonly called a load/stress test. We will use a tool called thanosbench to do that in this tutorial.
Of course, this program is not just limited to Thanos Query. You can stress test any of the other previously components or any other thing that implements the StoreAPI. But we will focus on Thanos Query in this post as that is the focal point where users’ queries come in.
Tutorial
Running thanosbench
To run it, you will need to set up Go on your machine. You can find a tutorial here on how to do it.
To validate whether you have Go installed properly, you can use govalidate. For example, on my machine it shows:
 $ ./govalidate_linux_amd64
[✔] Go (go1.14.2)
[✔] Checking if $PATH contains "/home/gstatkevicius/go/bin"
[✔] Checking gcc for CGO support
[!] Vim Go plugin
    Vim is installed but cannot determine the Go plugin status.
    See https://github.com/fatih/vim-go to install.
[✔] VSCode Go extension
Of course, depending on your machine’s state, you will see a different output but the most important thing is that Go is installed as you can see on the first line.
Then, we need to clone the source and compile it. For this, you’ll need GNU Make and git on your machine:
$ git clone https://github.com/thanos-io/thanosbench.git
$ cd thanosbench
$ make build
Now you can run thanosbench and see all of the available options:
$ ./thanosbench -h
usage: thanosbench [<flags>] <command> [<args> ...]

Benchmarking tools for Thanos

Flags:
  -h, --help               Show context-sensitive help (also try --help-long and --help-man).
      --version            Show application version.
      --log.level=info     Log filtering level.
      --log.format=logfmt  Log format to use.

Commands:
  help [<command>...]
    Show help.

...

  stress --workers=WORKERS [<flags>] <target>
    Stress tests a remote StoreAPI.
We will use the stress subcommand in the rest of this tutorial. The <target> argument is a pair of an IP address and a port delimited by a colon (‘:’).
How It Works
To find out all of the available flags, run:
./thanosbench stress -h

usage: thanosbench stress --workers=WORKERS [<flags>] <target>

Stress tests a remote StoreAPI.

Flags:
  -h, --help                  Show context-sensitive help (also try --help-long and --help-man).
      --version               Show application version.
      --log.level=info        Log filtering level.
      --log.format=logfmt     Log format to use.
      --workers=WORKERS       Number of go routines for stress testing.
      --timeout=60s           Timeout of each operation
      --query.look-back=300h  How much time into the past at max we should look back

Args:
  <target>  IP:PORT pair of the target to stress.
The way it works is that at first thanosbench asks for all of the available metric names. Then, WORKERS number of goroutines are spawned. All of them are constantly sending Series() calls via gRPC, reading the results, and discarding them. It asks for data that spans anywhere from the current time to the current time minus the time range provided by --query.look-back .
Please note that your Thanos Store might have a sample limit by the way of --store.grpc.series-sample-limit or some other limits might be hit so if any errors occur then I would recommend you to either turn those limits off while you are stress testing Thanos Query or increasing those parameters until you’d hit physical limits. This is because we want to objectively test how much load we can handle at most and increase/decrease the limits after knowing the exact numbers.
Ideally, to test the maximum capabilities of your Thanos Store node, you need to set --query.look-back to the value that is the maximum of your retention times set on Thanos Compactor i.e. max(retention.resolution-raw, retention.resolution-5m, retention.resolution-1h). However, it only asks for raw data at the moment. Generally, you are supposed to have those three retention periods set to the same value so I think this advice is still applicable. We could parameterize this in the future. Pull requests are welcome.
Also, we could improve by spamming calls to other gRPC methods that are exposed by StoreAPI as well such as LabelValues(). But, for the time being only Series() is sufficient because that call generates the most load and that is what users do most of the time.
What’s more, you should most likely set the --timeout parameter to the value of –query.timeout that you have on your Thanos Query node. This helps to mimic the exact thing your users would do in the worst-case i.e. waiting the whole time period until they’d their results.
Things To Look For
Of course, you need to follow the application-specific metrics. For that, I would recommend you to import the dashboards from here.
As you can see in this Thanos Sidecar dashboard, running with even a few workers immediately leads to a huge increase in resource consumption:
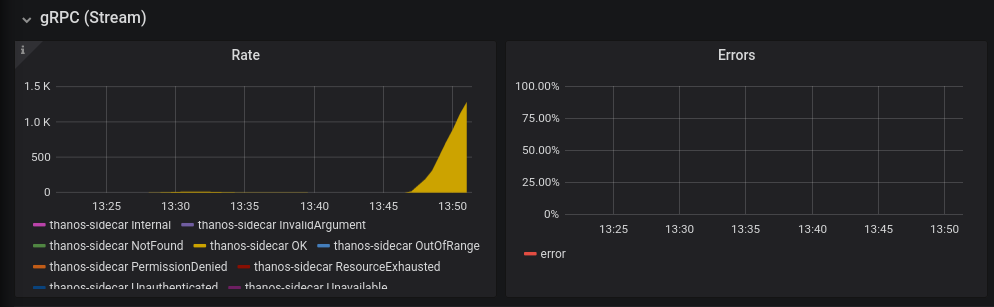
There are the three golden signals you should look out for in those dashboards:
- Request rate
- Error rate
- Duration
All of the ideal values of those metrics are specific to your service level. Obviously, in a perfect world, you should be able to handle as many requests as possible with the least amount of duration and with no errors. Normally, you’d look at the 99th percentile of durations:
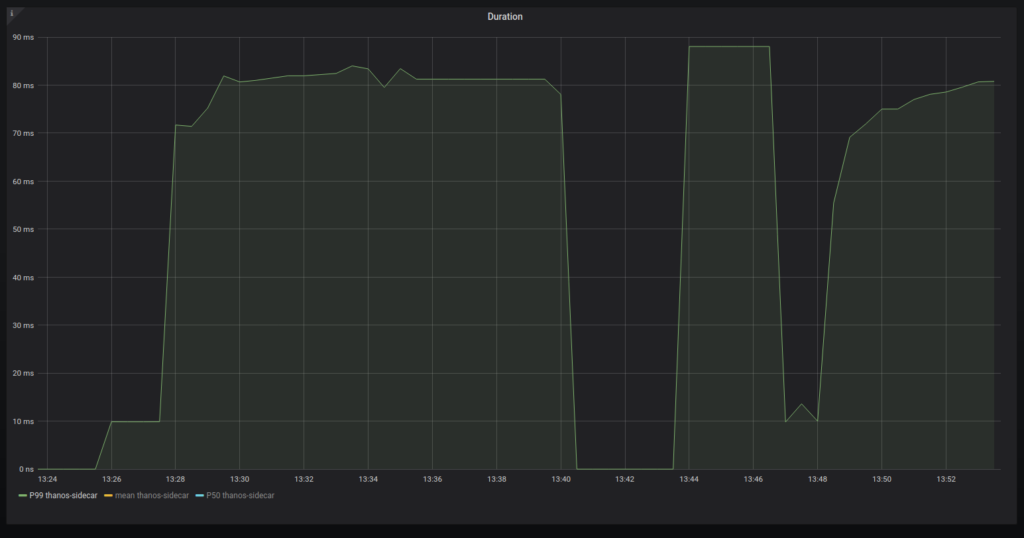
This is a very small duration because I am running it on my own computer.
Also, operating system-level metrics are very important as well. You can get them by installing node_exporter or wmi_exporter with their respective dashboards. RAM consumption should ideally be maximally around 80% to have some margin in case you will want to perform some RAM heavy operations. CPU and other resources are reflected via the latency metrics provided by Thanos.
I think all of the things related to stress testing a live Thanos deployment should be covered by this article. Obviously, improvements are always possible so feel free to open up a pull request on thanosbench and/or comment down below if you notice any issues!